Swap Devuan for Android on a Craig CLP281
ARCHIVED
This document is archived and may be out of date or inaccurate.
NOTICE
WARNING You could brick (render unusable and unrecoverable) your device while attempting to follow these instructions. Please make sure you know what you are doing and are prepared for the risks. Obviously you follow (or modify) these instructions entirely at your own risk.
A Note For Less Adventurous Users
With the instructions here it is necessary to have access to the serial port. If you prefer not open the device (physically) or do not wish to risk bricking (rendering unusable and unrecoverable) your device, and just want to run Debian from and SD card, see my article on (Almost) Modern Debian on a Craig CLP281 Netbook.
Preliminaries
It would be helpful to be familiar with my article on (Almost) Modern Debian on a Craig CLP281 Netbook, as it contains much of the basic information about the Craig CLP281.
Hardware — Unassembled
Disassembly
- This is mostly a case of removing screws and being careful, so not detailed here.
- Leave the monitor hooked up to the mainboard, otherwise you have desolder the power button which is soldered directly to the mainboard and monitor. This also is needed for the power button to be available.
- Removing the keyboard is a pain due to no play on the ribbon cable attaching it to the mainboard (and reassembly is likewise annoying). You need to pull out the latch for the socket for the ribbon cable on mainboard and then gently pull out the ribbon cable.
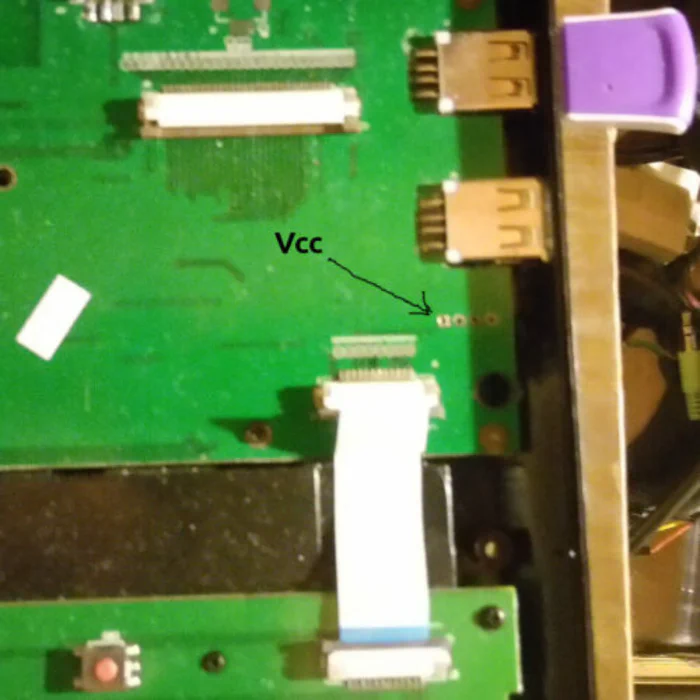
Serial header
The serial header on these devices is unpopulated but the holes are open (not filled with solder), so it is relatively easy to temporarily connect a serial to USB cable to the header (this allows to monitor and/or modify U-Boot settings).
Viewed from the top and with the mainboard oriented as it is in the case when the keyboard is towards the user, and display to the back of the unit, the serial header of the Craig CLP281 is on the middle right of the mainboard.
Pinouts
| Name | Map | Map | Map | Map |
|---|---|---|---|---|
| Pin | 1 | 2 | 3 | 4 |
| Signal | Vcc | RX | TX | GND |
Pin one (1) / Vcc is denoted by a square circuit pad compared to a round circuit pad for each of the holes of the unpopulated serial header.
Installing Devuan as The Firmware
First Steps
Get Debian Running from SD Card First
It will save you a lot of grief to make sure you have Debian successfully running from SD Card before making the leap to replacing the firmware. See (Almost) Modern Debian on a Craig CLP281 Netbook for information on doing that.
Make Sure U-Boot Networking is Working
This is required in case something goes wrong and you want to revert to the stock (Android) firmware.
Make Sure You Know How to Use U-Boot to Recover
Discussing this is beyond the scope of this article, but you should be able to find information via web search.
Backup the Flash Contents
This is required in case something goes wrong and you want to revert to the stock (Android) firmware.
- While booted into Devuan from the SD Card, make sure mtd-utils
is installed. E.g.
apt-get install mtd-utils
While on the Craig CLP281 execute the following script (in a location with at least 5GB free space), and copy the resulting .bin files to a safe place.
for mtddev in $(seq 6 16); do
  nanddump --oob --bb=dumpbad --forcebinary -f backup-mtd$mtddev.bin /dev/mtd${mtddev}
done
for mtddev in $(seq 0 5); do
  dd if=/dev/mtd${mtddev} of=backup-mtd${mtddev}.bin
done
Prepare the Operating System
Build or Obtain a Suitable Kernel
Build a kernel as shown in (Almost) Modern Debian on a Craig CLP281 Netbook.
Build a Devuan Jessie Rootfs
Build a rootfs as shown in (Almost) Modern Debian on a Craig CLP281 Netbook.
Copy the Rootfs to SD Card
As detailed in the (Almost) Modern Debian on a Craig CLP281 Netbook
Copy the Kernel to the SD Card
Following (Almost) Modern Debian on a Craig CLP281 Netbook this will already be included in the rootfs.
Boot from the SD Card
As detailed in the (Almost) Modern Debian on a Craig CLP281 Netbook NB: Make a copy of the what appears on the serial console as you boot. Also, keep a copy of the output of dmesg after logging in after a fresh boot.
Switch Over to Booting From Flash in Stages
Make a Copy of the Rootfs in a Subdirectory on the SD Card
- On the CLP281: Identify partition LocalDisk from
cat /proc/mtd(it should be large)Find the exact size of LocalDisk using cat
/proc/mtdand dmesg (immediately after boot).Since we’re going to be running from flash it’s probably a good idea to disable logging.
- /etc/init.d/rsyslog stop
- update-rc.d rsyslog disable
Install flash tools
apt-get install mtd-utils u-boot-tools
- Shutdown and remove the SD Card
- On a linux host:
apt-get install rsync- Mount the SD Card on
/mnt mkdir wheezy-clp281-rootfssudo rsync -arltDHAXx --info=progress2 /mnt/ wheezy-clp281-rootfsmkdir -p /mnt/root/rootfssudo rsync -arltDHAXx --info=progress2 wheezy-clp281-rootfs/ /mnt/root/rootfssync– this will take a while as the data is flushed
- Mount the SD Card on
Modify the Mounts (Fstab) on the Rootfs
sudoedit /mnt/root/rootfs/etc/fstab- Modify
/etc/fstabto point to the root partition you will be using. E.g. Replace/dev/mmcblk0p3 / ext4 defaults 0 1withubi0:rootfs_vol / ubifs defaults 0 0 sudo eject /mnt
Create the Rootfs on NAND Flash (on the CLP281)
For this discussion we are assuming that LocalDisk is on
/dev/mtd16. If this is not true for your system, adjust
accordingly. Identify LocalDisk by executing cat /proc/mtd
- Boot from the SD card
- Log in as root (or become root).
cd /root- Make a copy of LocalDisk
nanddump --oob --bb=dumpbad --forcebinary -f backup-LocalDisk.bin /dev/mtdXX
ubiformat /dev/mtd16- ubiattach -p /dev/mtd16 -d 0- ubimkvol /dev/ubi0 -N rootfs_vol -m- ‘‘mkfs.ubifs -r rootfs -x favor_lzo /dev/ubi0_0
Boot From the Rootfs on NAND Flash (using SD Card as Boot)
While still booted on CLP281:
cd /boot- Make backups of
wmt_scriptcmd.srcandwmt_scriptcmd sudoedit wmt_scriptcmd.src— this should be the boot script you created previously. If not, you’ll need to copy it or recreate it.- Replace
setenv bootargs mem=${memtotal} root=/dev/mmcblk0p3 noinitrd rw rootfstype=ext4 console=tty1 console=ttyS0,115200n8 lpj=${lpj} ${platform_bootargs} init=/sbin/init rootdelay=1Withsetenv bootargs mem=${memtotal} ubi.mtd=16 root=ubi0:rootfs_vol noinitrd rw rootfstype=ubifs console=tty1 console=ttyS0,115200n8 lpj=${lpj} ${platform_bootargs} init=/sbin/init rootdelay=1— assuming your LocalDisk is/dev/mtd16. mkimage -A arm -O linux -T script -C none -n "Boot Debian" -a 0 -e 0 -d wmt_scriptcmd.src wmt_scriptcmd- Reboot — e.g.
shutdown -r now
Verify You Have Booted From NAND Rootfs
Log in as root
mountYou should see something like:
ubi0:rootfs_vol on / type ubifs (rw,relatime)
/dev/mmcblk0p1 on /boot type vfat (rw,relatime,fmask=0022,dmask=0022,codepage=cp437,iocharset=iso8859-1,shortname=mixed,errors=remount-ro)
...
Remove the
/dev/mmcblk0p1 /boot ...line from/etc/fstab
Copy Kernel to NAND Flash and Boot From it Using SD Card
- cd
/boot - Identify
kernel-NANDfromcat /proc/mtd - Make a copy of kernel-NAND
nanddump --oob --bb=dumpbad --forcebinary -f backup-kernel-NAND.bin /dev/mtdXX
- Copy the kernel image to NAND
flash_erase /dev/mtdXX 0 0nandwrite -m -p /dev/mtdXX uzImage.bin
- Make backups of
wmt_scriptcmd.src andwmt_scriptcmd ls -al uzImage.bin- Take the size of
uzImage.binabove. You will use that for [size] below. - Modify
wmt_scriptcmd.srcand replacemmcinit 0 fatload mmc 0 0x0 uzImage.binwithnandrw r 0x2600000 0x0 [size]
NB Verify the0x2600000by looking at the output from dmesg that shows the start offset ofkernel-NAND. mkimage -A arm -O linux -T script -C none -a 0x0 -e 0x0 -n "Boot Debian" -d wmt_scriptcmd.src wmt_scriptcmd- Reboot with serial console attached to the CLP281.
- The serial console should show that you are booting the kernel from NAND flash.
Use Swap on NAND flash
NB Only do this if you absolutely must (e.g. running even a light desktop like LXDE and trying to do anything ‘real’). It would be far better to stick to a thin client scenario (no browser, no office suite, no graphics program, just tunnel X11 over SSH or similar lightweight protocols to use a remote system) if you must have a graphical environment. It can, however do reasonably well as a CLI environment.
mount /dev/mmbclk0p1 /bootcd /bootIdentify
android-data fromcat /proc/mtdMake a copy of
android-datananddump --oob --bb=dumpbad --forcebinary -f backup-android-data.bin /dev/mtdXX
Format
android-datafor use by ubi block driver and attach it.ubiformat /dev/mtd14ubiattach -p /dev/mtd14 -d 1
Create an UBI volume.
ubimkvol /dev/ubi1 -N swap_vol -m
Identify the new MTD device for the UBI volume via cat
/proc/mtd.Create swap on
swap_vol:mkswap /dev/mtdblockXXActivate swap:
swapon /dev/mtdblockXXAdd the new volume to fstab and boot (kernel) commandline
- Add the following to
/etc/fstab/dev/mtdblockXX sw swapon defaults 0 0 - Edit wmt_scriptcmd.src:
Add ubi.mtd=XXto the end of the setenv bootargs line.mkimage -A arm -O linux -T script -C none -a 0x8000 -e 0x8000 -n "Boot Debian" -d wmt_scriptcmd.src wmt_scriptcmdsyncumount /boot
- Add the following to
Reboot
As root execute
swapon -sYou should see:
Filename Type Size Used Priority
/dev/mtdblock18 partition 507992 0 -1
Modify U-Boot to Boot From NAND
Reboot with serial console active, and as the system is booting, keep pressing ENTER in the serial console, until you get a WMT # prompt. NB. If autoboot reaches 0 (zero) and you system boots normally you will have to reboot and try again.- Save the old u-boot environment variables (substituting your MTD devices if different than below), and set up the new:
setenv old-kernel-NAND_ofs ${kernel-NAND_ofs}
setenv old-kernel-NAND_len ${kernel-NAND_len}
setenv old-bootcmd ${bootcmd}
setenv kernel-NAND_len [length-of-your-kernel-from-previous-steps]
setenv newkernelargs 'setenv bootargs mem=${memtotal} ubi.mtd=16 root=ubi0:rootfs_vol noinitrd rw rootfstype=ubifs console=ttyS0,115200n8 console=tty1 lpj=${lpj} ${platform_bootargs} init=/sbin/init rootdelay=1 ubi.mtd=14'
setenv bootcmd 'display init force ; nandrw r ${kernel-NAND_ofs} 0x0 ${kernel-NAND_len}; if iminfo 0x0; then run newkernelargs; bootm 0x0; fi; echo No kernel found'
saveenv
poweroff
Remove SD card & power on the system.- You should boot into your Debian system using only flash.
Revert to Stock Android
Set your SD Card to boot from SD Card, not Flash
Copy your first backed up wmt_scriptcmd back as the script to use. This should be the script that boots from SD Card.
Boot from the SD Card.
If you execute mount you should see something like:
/dev/root on / type ext4 (rw,relatime,barrier=1,data=ordered)
tmpfs on /run type tmpfs (rw,nosuid,noexec,relatime,size=20960k,mode=755)
tmpfs on /run/lock type tmpfs (rw,nosuid,nodev,noexec,relatime,size=5120k)
proc on /proc type proc (rw,nosuid,nodev,noexec,relatime)
sysfs on /sys type sysfs (rw,nosuid,nodev,noexec,relatime)
tmpfs on /dev type tmpfs (rw,relatime,size=10240k,mode=755)
tmpfs on /run/shm type tmpfs (rw,nosuid,nodev,noexec,relatime,size=146960k)
devpts on /dev/pts type devpts (rw,nosuid,noexec,relatime,gid=5,mode=620)
/dev/mmcblk0p1 on /boot type vfat (rw,nosuid,nodev,relatime,fmask=0022,dmask=0022,codepage=cp437,iocharset=iso8859-1,shortname=mixed,errors=remount-ro)
Restore Partition Data
NB This will only work if there are no bad sectors on the flash. If there are bad sectors on flash then Android will not work correctly.
- Restore the Swap Partition (which is the android-data)
cd /boot(assuming you stored the partitions here)- Identify android-data mtd device.
flash_erase /dev/mtdXX 0 0nandwrite -k -o -p /dev/mtdXX [your-nanddump-backup-of-android-data.bin]
- Restore the Kernel Partition (which is the android kernel)
- Identify kernel-NAND mtd device
flash_erase /dev/mtdXY 0 0nandwrite -k -o -p /dev/mtdXY [your-nanddump-backup-of-kernel-NAND.bin]
- Restore the LocalDisk Partition (internal user storage)
- cd
/root(assuming you still have the LocalDisk backup there). - Identify LocalDisk mtd device
flash erase /dev/mtdXZ 0 0nandwrite -k -o -p /dev/mtdXZ [your-nanddump-backup-of-LocalDisk.bin]
- cd
Restore the U-Boot Environment
Reboot with serial console active, press ENTER until you get the WMT # prompt.
setenv kernel-NAND_ofs ${old-kernel-NAND_ofs}
setenv kernel-NAND_len ${old-kernel-NAND_len}
setenv bootcmd ${old-bootcmd}
saveenv
poweroff
Remove SD card & boot system.- You should be back in Android.
If reverting to flash does not succeed, check if you have bad sectors on flash (you should get messages on the serial console and in dmesg if you do. You can also use mtd-utils tools to help examine the situation). If you have bad cells, you may be out of luck (although probably the device was having issues prior to flashing Debian anyway due to unreliable flash erase blocks).