Author recommended for Windows 10 Pro
Additional security settings
Next, we want to use ‘Local Security Policy’.
This can be found in the ‘Start Menu’ under ‘Windows Administrative Tools’.
Set your Account Policy
Navigate to
Account Policy|Password Policy|Maximum password age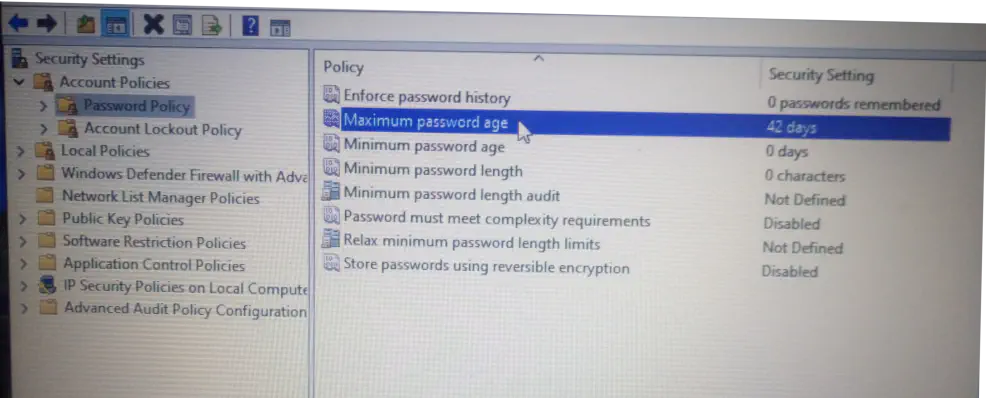
The author recommends setting no maximum age on password as he believes it causes more trouble than it is worth to set an arbitrary forced password change.
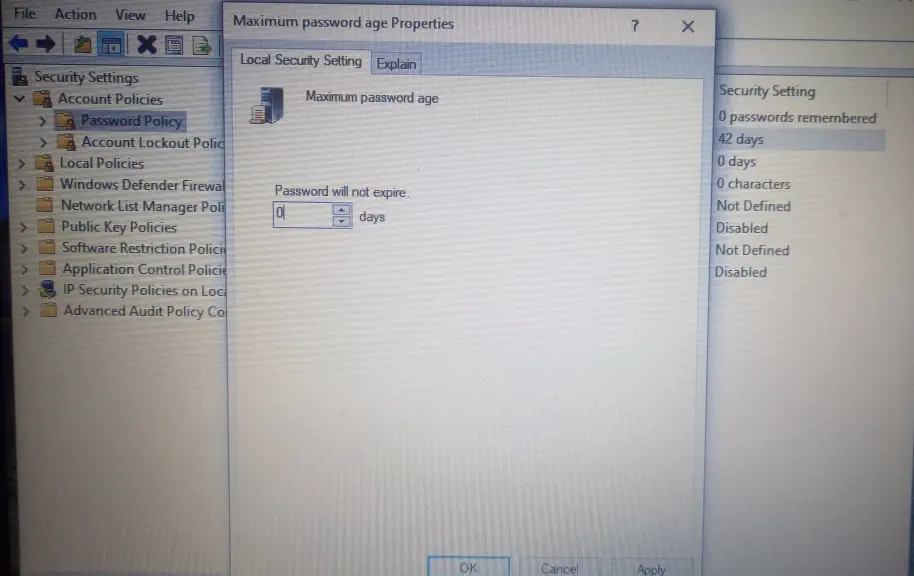
Navigate to
Account Policy|Password Policy|Minimum password length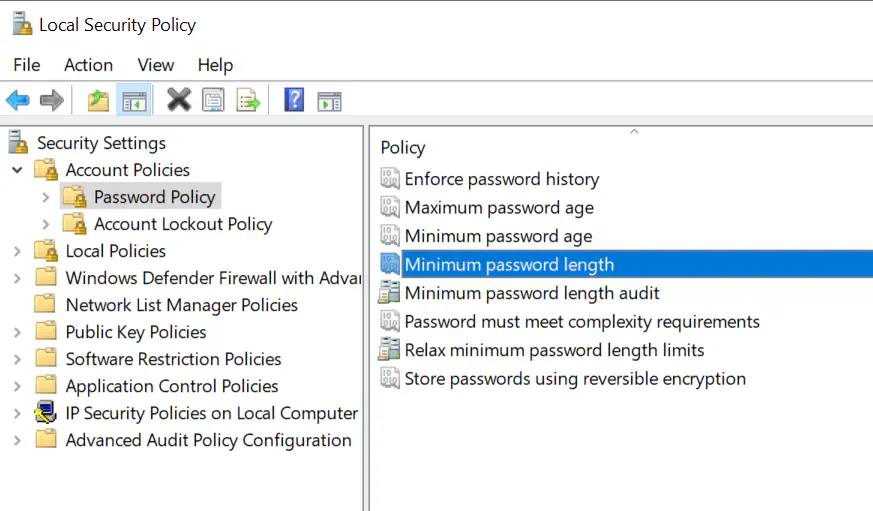
And set a minimum password length (the author’s preferred minimum is at least 12).
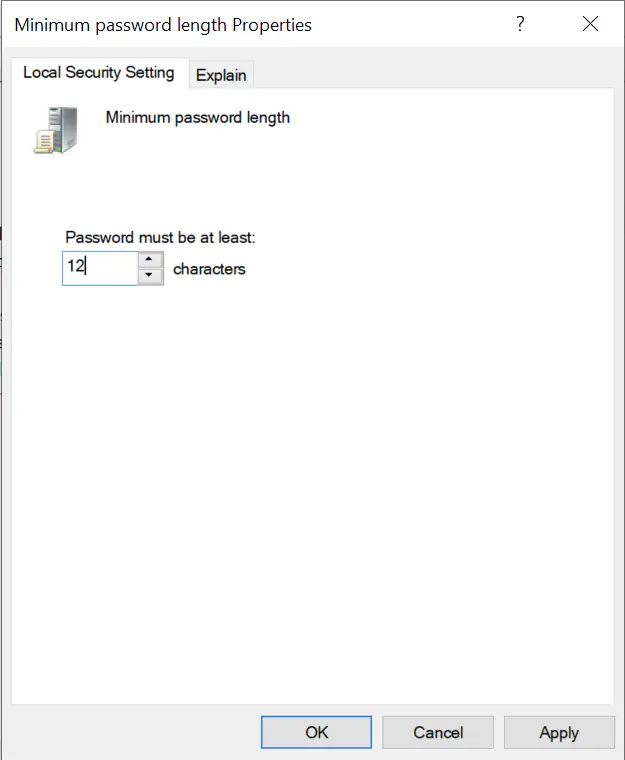
Navigate to
Account Policy|Account Lockout Policy|Account lockout thresholdSet the
Account lockout thresholdto the maximum number of login attempts you wish to allow before a soft lockout. When you do you will get a popup indicating the default lockout time periods (default is to block the account for 30 minutes on reaching the threshold number of failures)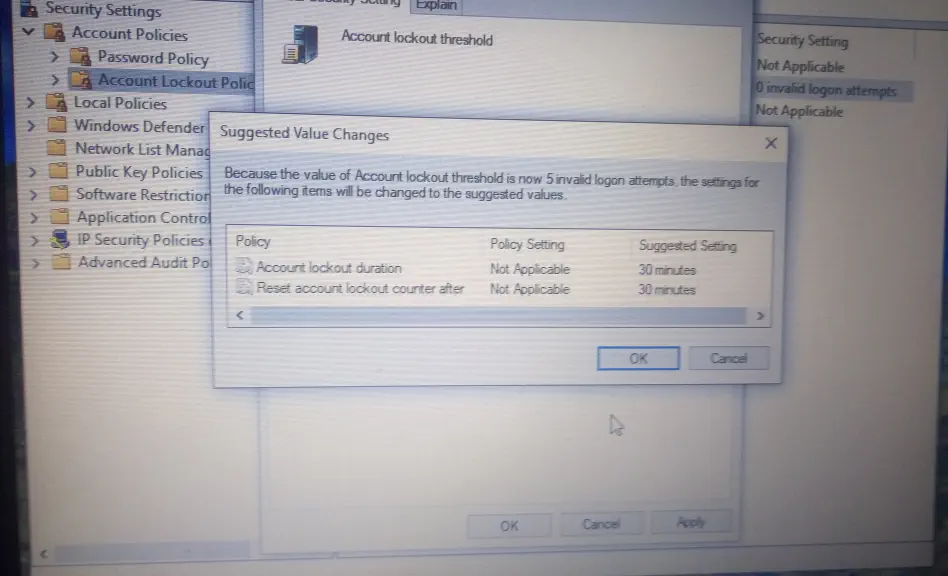
Now set Local Policies|Security Options
There are number these to modify; we’re not going show screenshots of setting them, but will only give the recommended settings.
| Setting | Value |
|---|---|
| Interactive Login: Display user information when session is locked | Select ‘User display name only’ OR ‘Do not display user information’ |
| Interactive Login: Do not require CTRL+ALT+DEL | Disabled |
| Interactive Login: Machine inactivity timeout | 300 (seconds) |
| Microsoft network client: Digitally sign communications (always) | Enabled |
| Microsoft network client: Digitally sign communications (if server agrees) | Enabled |
| Microsoft network client: Send unencrypted password to third-party SMB servers | Disabled |
| Microsoft network server: Digitally sign communications (always) | Enabled |
| Microsoft network server: Digitally sign communications (if client agrees) | Enabled |
| Network security: LAN Manager authentication level | Send NTLMv2 response only. Refuse LM & NTLM |
| User Account Control: Admin Approval Mode for the Build-in Administrator Account | Enabled |
| User Account Control: Allow UIAccess applications to prompt for elevation without using the secure desktop | Only enable if you require the ability to administer the system using Remote Desktop |
| User Account Control: Behaviour of the elevation prompt for administrators in Admin Approval mode | If you enable ‘UIAccess applications’ above, choose ‘Prompt for consent on the secure desktop’, otherwise choose ‘Prompt for credentials on the secure desktop’ |
| User Account Control: Behaviour of the elevation prompt for standard users | Prompt for credentials on the secure desktop |
The remaining ‘User Access Control’ settings should be ‘Enabled’ except ‘Only elevate executables which are signed and validated’ which needs to be disabled unless you are fortunate enough to only need admin access for Microsoft-blessed executables.
A BitLocker-related tweak
If you’ve used BitLocker and used a USB drive to store the security information required to unlock the drive on boot, this author recommends you use ‘Disk Management’ and ‘Remove Drive Letter’ for the USB drive that has the key. This reduces the chances of it accidentally being used for any other purpose.
Some ‘Windows Defender’ security options
- In
Windows Security, if you have enabledCore Isolationyou may be interested inWindows Defender Application GuardunderApp & browser control|Isolated browsing. Enabling this adds an option to Edge that essentially allows you to open an Edge window in a virtual (protected) environment without launching an actual virtual machine. There are also extensions for Google Chrome and Firefox, with caveats. - Another useful option is to enable
Virus & threat protection|Ransomware protection|Controlled folder access. Note that for third party unsigned applications you will need to make a special exception if they access things like the ‘Documents’ folder, or the base hard drive (e.g. ‘Libre Hardware Monitor’). - The final option for this sections, is enabling
Virus & threat protection|Virus & thread protection settings|Change notification settings|Account protection notifications
General environment settings
- There are probably some other initial tweaks you will want to make,
especially if you are used to a particular desktop setup.
- Some of your setup (if you have previously used the same Microsoft Account and enabled synchronization then and haven’t disabled it now) will automatically be brought over, but some things, like the author’s personal preference of having the taskbar on the right-hand side of the screen, instead of along the bottom of the screen, have to be configured for each user and device (especially with a personal account rather than ‘business’ setup).
- Some per-device configuration most will probably want, is setting up “Display Settings” as they prefer.
- Another is that for a DDI (Double-density = 2K) or higher pixel count you will probably find the fonts and icons extremely small, so you may want to use a scaling factor (the author finds 125% tends to have issues, due to the math, but 150% usually works well on a 2K display).
- Assuming you use OneDrive, then from ‘File Explorer’ in your ‘home’ (user profile in Windows parlance) directory, you probably want to move folders like ‘3D Objects’, Downloads, Music, and Videos into ‘OneDrive’; you will still see them in ‘File Explorer’ under your user profile (home) directory, but their ‘Location’ (in the folder’s Properties) will have changed to a subfolder of the ‘OneDrive’ folder.
- If using Documents backed up to OneDrive (so
%USERPROFILE%\Documentsfolder is empty and%USERPROFILE\OneDrive\Documentsis your actual Documents folder), you might want to delete%USERPROFILE%\Documentsto avoid confusion. - Configuring the Weather app on ‘Start Menu’ or removing it from there makes sense (and is per-device)
- In general the ‘Start Menu’ has to be configured per-device and is about personal preferences; you might want to tweak a few things now that make further setup more convenient, but do the main tweaking once you’ve got all your programs and apps installed and/or as you have time.
- It is similar for the Cortana button on the taskbar (the author removes the
Cortana icon since he doesn’t use Cortana)
- To do that for yourself right-click on the taskbar and make sure that ‘Show Cortana icon’ is not checked.
- Monitor adjust (colour calibration). You want to do this more than you
realize! It’s amazing how much of a difference it makes.
- Go to
Control Panel|Colour Management|Advanced|Calibrate displayand follow the directions
- Go to
- If you have a Microsoft 365 Personal or Family subscription, the author
recommends you install the MS 365 desktop apps (traditional Word, Excel,
Publisher, etc) at this point,
- First uninstall the freebie version of OneNote (it can not only be confusing which version you want but the exiting install can interfere with proper operation of the MS 365 version).
- The author recommends installing Microsoft 365 desktop apps through the link in your Microsoft 365 account rather than from the Microsoft Store as he experienced issues with the Microsoft Store install of the desktop apps.
- Now is a good time to browse through
Settingsand tweak features on or off or configured them as you wish. - You will probably want at least a few things from the Microsoft Store (I’ll
just talk about freebies, since paid content tends to be based on personal
preferences and interests).
- Go to ‘My Library’
- Hide what you don’t want to install on this device.
- Whether from ‘My Library’ (because you’ve done this before), or by
searching the store, the author recommends the following apps:
- Microsoft To Do (this may have been installed with MS 365; if so prefer that version; likewise with OneNote)
- Your Phone
- Go to ‘My Library’
- In
Settings|Time & LanguageI recommend you download all the options for your language (if it’s not English US and you used and English US installer, or English UK using the English UK installer), and once the downloads are complete, make sure all the language settings are configured to use your language. - Setup signatures in Outlook and Microsoft Mail (these, sadly, are not synced)
- If you use OneDrive and you have enough local storage, you probably want to enable ‘Always keep on this device’ on OneDrive; otherwise you will want to keep at least your most essential documents and so on ‘Always on this device’.
- You should enable
FileHistoryfor backing up local files to external storage or a network drive. It’s not perfect and you need to regularly check theEvent Viewerto make sure that backups are succeeding, but it’s the bare minimum of what you should do. Note that it doesn’t backup files that are only stored in the cloud.
Power user / developer settings
- Another tweak the author likes is pinning his home (user profile in Windows speak) folder to ‘Quick Access’ (e.g. having a ‘Quick Access’ link to C:\Users\my-user).
- The author also finds it convenient to have the
Control Panelon the Start Menu - Also for the
Control Panelthe author prefers the ’large icon’ view, rather than category based. - You will probably want at least a few things from the Microsoft Store (We’ll
just talk about freebies, since paid content tends to be based on personal
preferences and interests).
- Whether from ‘My Library’ (because you’ve done this before), or by
searching the store:
- Windows Terminal
- Python
- Diagnostic Data Viewer
- Whether from ‘My Library’ (because you’ve done this before), or by
searching the store:
- In
Control Panel|Programs & Featureswe want to add the following Windows Features:- Windows Subsystem for Linux (aka WSL)
- The rest require that your device supports Hyper-V. To check if it meets
the requirements, execute
systeminfo.exein an Administrative PowerShell.- Hyper-V
- VM Platform—for WLS2
- Windows Hypervisor (For VirtualBox, Vagrant, Docker, etc)
- Configure your
Hyper-V SwitchinWindows Administrative Tools|Hyper-V Manager- I recommend adding an external network that shares the main LAN NIC with Hyper-V and the management host. Note that this cannot be a wireless link.
- If you have a second ethernet NIC, I recommend creating second external network that does not share with the host (so it will no longer be visible in you host, but you will be able to use with virtual machines).
- I also recommend moving the default Hyper-V Hard Drive location out of
Public.
- Update WSL2 kernel to the latest WSL2 kernel update package for x64 machines
- For WSL or WSL2 users: Install a Linux distro and configure (see Microsoft’s
Guide to Installing WSL and
WSL2).
- Once your distro is installed:
sudo apt updatesudo apt upgradesudo apt dist-upgradesudo apt install restic1
- Once your distro is installed:
- In an Administrator PowerShell issue the command
Update-Help. - If you enable Remote Access to your system, the author recommends that in Windows Defender Firewall, to allow RDP connections only from private networks, and to limit them to coming from the local subnet.
Using Chocolatey to install ’traditional desktop’ software
Install Chocolatey (a package manager for Windows)
Just follow the official Chocolatey install guide.
Install software for Windows available through Chocolatey
NOTE: The original software licenses still apply so it is important that
they are compatible with your situation. You can verify that by using
the Chocolatey Online package
browser, or
ChocolateyGUI (a graphical interface for Chocolatey).
Most of the software is open source and ought to be no problem for internal use; if you are planning on ‘distributing’ anything then you need to pay close attention to licensing terms. The author has made note of any software that you may need to play closer attention to the licensing terms, even for internal use, for which the author is aware of the more complicated situation.
Some suggested software
Regular user software
| Package | Name | Description |
|---|---|---|
| chocolateygui | ChocolateyGUI | GUI for Chocolatey |
| Firefox | Firefox | Privacy-oriented Web Browser |
| GoogleChrome | Google Chrome | Google’s Web Browser |
| InkScape | InkScape | Vector graphics creator and editor |
| gimp | GIMP | A very powerful graphics / image manipulation program |
| keepassxc | KeePassXC | Password management tool |
| libre-hardware-monitor | LibreHardwareMonitor | System (CPU, memory, disk, temp, and so on monitoring in system tray) |
| quodlibet | Quod Libet | Music Player and Manager; Has more features than Groove Music, and the only Groove feature not present on Quod Libet may be the ability to stream and control Spotify from the music player app (instead of the standalone Spotify app). |
| screentogif | ScreenToGif | Screen, webcam, and sketch board recorder and editor |
| workrave | Workrave | RSI prevention utility (require regular breaks) |
| zoom | Zoom | Video conferencing / chat. NB If you have more than one computer your probably need to install manually due to download restrictions; also pay attention to the licensing terms. |
Power user / developer software
| Package | Name | Description |
|---|---|---|
| 7zip | 7-zip | Compress/Decompression and archiving/unarchiving |
| etcher | Etcher | Write images to removable media (USB/SD cards/etc) |
| git | Git for Windows | The major version control and source code management system in the software world |
| git-credential-manager-for-windows | Git Credential Manager for Windows | Manage Git credentials using the Windows system secrets store |
| golang | Go | The Go language and standard library |
| nano | Nano | Powershell / Cmd console text editor |
| notepadplusplus | Notepad ++ | A better notepad (text editor) for Windows |
| restic | Restic | Command-line backup software |
| sysinternals | SysInternals | Power tools for Windows |
| vscode | Visual Studio Code | Code and text editor and development environment, and more |
| wincompose | WinCompose | Compose key for windows – intuitive entry of unusual characters |
| xca | XCA | SSL certificate creation and management |
Configure 7-zip for best effect
Make 7-zip the default for filename extensions for which Windows doesn’t have native support.
- Launch 7-zip as Administrator
- Select
Tools|Options - Select 7-zip as the default program for any filename extension not claimed by another program (e.g. not .zip)
Configure SSH and Git
Notes
This assumes use of SSH public/private keys for Git. If you prefer to use the Git Credential Manager for Windows with Git over HTTPS and using API keys, see Git Credential Manager for Windows Configuration
Enable the ‘ssh-agent’ Service
On the latest Windows 10 Pro OpenSSH agent should be installed by default. If not, then it can be installed by installing the “OpenSSH Client” Windows ‘feature’.
Execute the commands:
Set-Service -Name 'ssh-agent' -StartupType 'Automatic'
Start-Service 'ssh-agent'
Make Windows OpenSSH Client the default for Git for Windows
To set this for a single user set the environment variable GIT_SSH_COMMAND to
point to the OpenSSH binary in the user’s environment variables.
[Environment]::SetEnvironmentVariable("GIT_SSH_COMMAND", "cat - | $((Get-Command ssh).Source.Replace('\','/'))", [System.EnvironmentVariableTarget]::User)
Also, makes sure GIT_SSH is unset for the user:
[Environment]::SetEnvironmentVariable("GIT_SSH", "", [System.EnvironmentVariableTarget]::User)
To set it for all users, set GIT_SSH_COMMAND in the system environment
variables.
In an admin PowerShell:
[Environment]::SetEnvironmentVariable("GIT_SSH_COMMAND", "cat - | $((Get-Command ssh).Source.Replace('\','/'))", [System.EnvironmentVariableTarget]::Machine)
Also, makes sure GIT_SSH is unset in the system environment:
In an admin PowerShell:
[Environment]::SetEnvironmentVariable("GIT_SSH", "", [System.EnvironmentVariableTarget]::Machine)
Configure Git for Windows for better Linux compatibility
| Line | Purpose |
|---|---|
| 1 | Ignore changes do file ‘mode’ bits (e.g. execute permissions) |
| 2 | Make the default line ending for files Unix mode line endings. Windows 10 2004 supports text/source files of this type easily. |
| 3 | Disable changing the line endings depending on whether checking out on Windows or under WSL. |
| 4 | Set the default user name for commits and emails |
| 5 | Set the default user email for commits and emails |
| 6 | Make the default credential manager Git Credential Manager for Windows |
| |
A Bit of extra GfW configuration for safer pulls
This option prevents pulls from creating a merge or a forced update (i.e.
rewriting history) or rebase. You can still git fetch and manually merge or
rebase as necessary.
git config --global pull.ff only
Configuring WSL so Windows filesystems have proper Unix permissions
In the WSL environment you should add /etc/wsl.conf containing something like:
[automount]
enabled = true
options = metadata,uid=1000,gid=1000,umask=0022,fmask=0011

[network]
generateHosts = true
generateResolvConf = true
See Configuring WSL Launch Settings
Once you restart WSL (which involves more than just closing your current WSL terminal; the easiest way to guarantee a WSL restart is to reboot Windows), while in WSL files and directories from Windows (e.g. under /mnt) will have more normal Unix permission. You will be able to override with chmod for the effective permissions in WSL. Also note that in some cases there are Windows ACLs that also affect your effective permissions.
And finally, it’s generally not possible to delete files which are opened by another process in Windows, and therefore in WSL (which differs from plain Linux).
Configure Visual Studio Code for developing in WSL/WSL2
See the Visual Studio Code Guide to Developing in WSL
Configure local backups using Restic
NB This is not for the faint of heart. If you aren’t sure of how to make this work, you would be better off to purchase a backup solution for Windows 10.
In
Task Scheduler(which can be find in theStart MenuunderWindows Administrative Tools), SelectTask Scheduler LibrarySelect
Create Task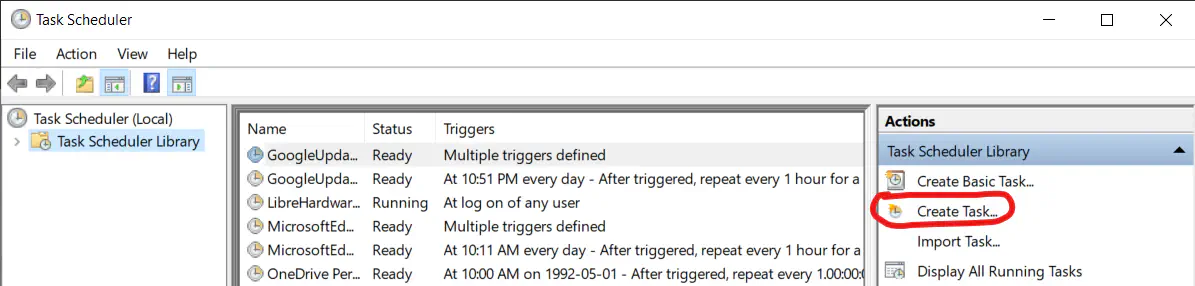
Create Restic Backup Task:
On the ‘General’ tab:
- Give the task a name.
- Set ‘When running the task, use the following account’ to SYSTEM
(using
Change User or Group…). - Check
Run with highest privileges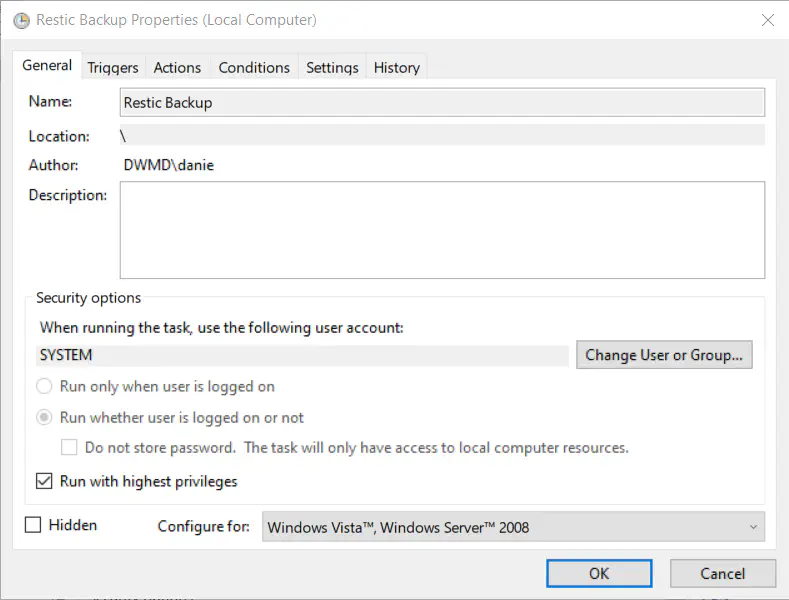
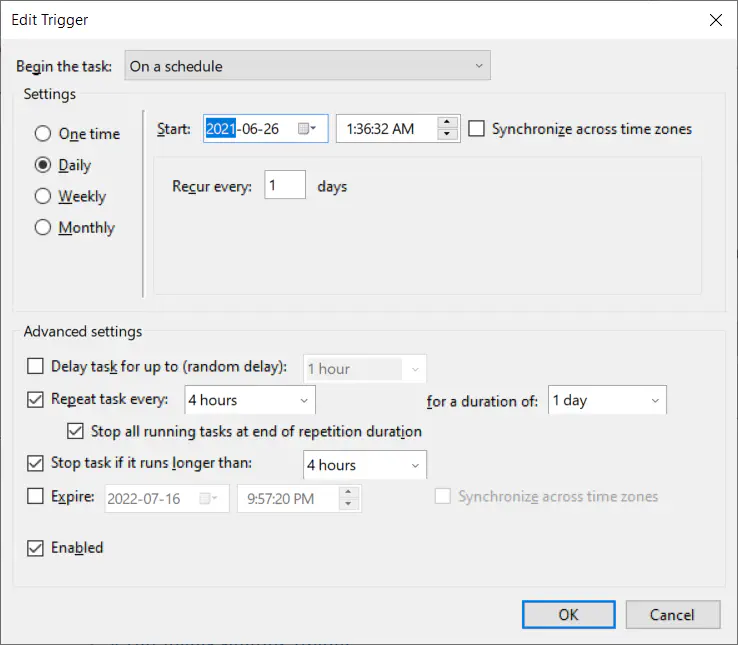
On the ‘Triggers’ tab:
- Select ‘New…’.
- Set task to repeat every hour hours, for 1 day.
- Set the task to stop if it runs longer than 4 hours.
- Make sure it is ‘Enabled’.
- Click ‘Ok’.
On the ‘Actions’ tab:
- Select ‘New…’.
- The action should be
Start a program - Program/script should be
C:\ProgramData\chocolatey\bin\restic.exe - Add arguments (optional): should be similar to:
-r rest:https://backuphost:31800/repo --password-file C:\ProgramData\restic\password-file backup --quiet --exclude **Temp** --exclude-caches --iexclude **\cache** --exclude **CanonicalGroupLimited.Ubuntu20.04onWindows** --cleanup-cache --exclude **WindowsApps\**\*.exe --use-fs-snapshot C:\ProgramData C:\UsersYou will obviously need to change
-r rest:https://backuphost:31800/repoto your actual repository, and you will need to create the password file and initialize the repo separately. See Restic documentation on ‘Read The Docs’ for details. 5. Start in (optional): should beC:\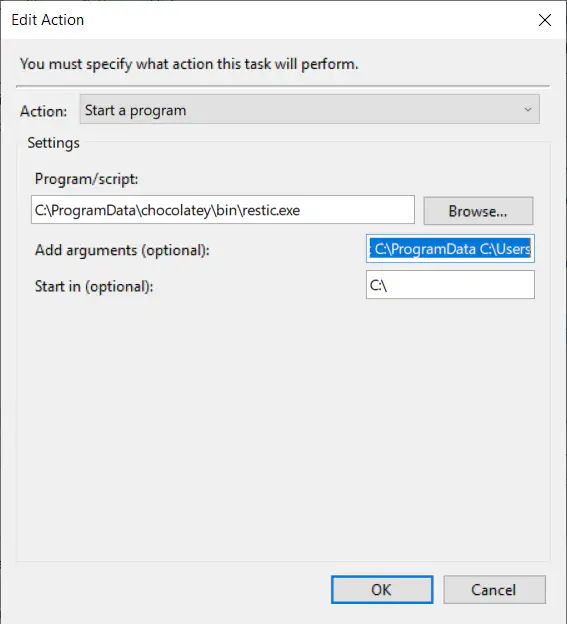 .
Click ‘OK’.
.
Click ‘OK’.Adjust the
ConditionsandSettingsif you need to do so.Click ‘OK’.
Assuming you have previously initialized the repo, and created the password file, Click ‘Run’. The task should run for some time, and when done the status code should be
0x0(success).
For doing backups. See Enabling backups of WSL for some info on how you might set that up, only use
resticinstead ofborg. For more details on restic, see Restic documentation on ‘Read The Docs’. ↩︎